
UART Communication Between ESP32 with Raspberry Pi Pico
- eMbed Workshop
- Apr 16, 2023
- 2 min read

Updated: Jun 9, 2023
UART Communication Between ESP32 with Raspberry Pi Pico with pico code in micro python and arduino code for esp32
Needed equipment:
ESP32
Raspberry Pi Pico
two jumper wires
BASICS
This project demonstrates how to establish communication between an ESP32 microcontroller and a Raspberry Pi Pico microcontroller using UART (Universal Asynchronous Receiver/Transmitter) protocol. UART is a popular serial communication protocol used for exchanging data between microcontrollers, sensors, and other devices.
The project makes use of the HardwareSerial library in Arduino, which provides built-in support for UART communication. The ESP32 and Raspberry Pi Pico are connected via their respective RX (receive) and TX (transmit) pins, and the UART communication is initialized with a specified baud rate, data format, and pin configuration.
The Arduino sketch sets up two UART objects, uart_esp32 and uart_pico, to communicate with the ESP32 and Raspberry Pi Pico respectively. The sketch reads data from the Serial Monitor and transmits it to the Raspberry Pi Pico via the uart_esp32.write() method, and also receives data from the Raspberry Pi Pico and prints it to the Serial Monitor using the uart_esp32.read() and Serial.write() methods.
The project also includes error handling, such as checking for available data using the available() method and flushing the buffers using the flush() method to ensure reliable data transmission.
This project can be used as a foundation for various applications that require communication between ESP32 and Raspberry Pi Pico, such as remote sensing, IoT projects, and home automation systems. It provides a basic understanding of UART communication and serves as a starting point for more advanced projects.
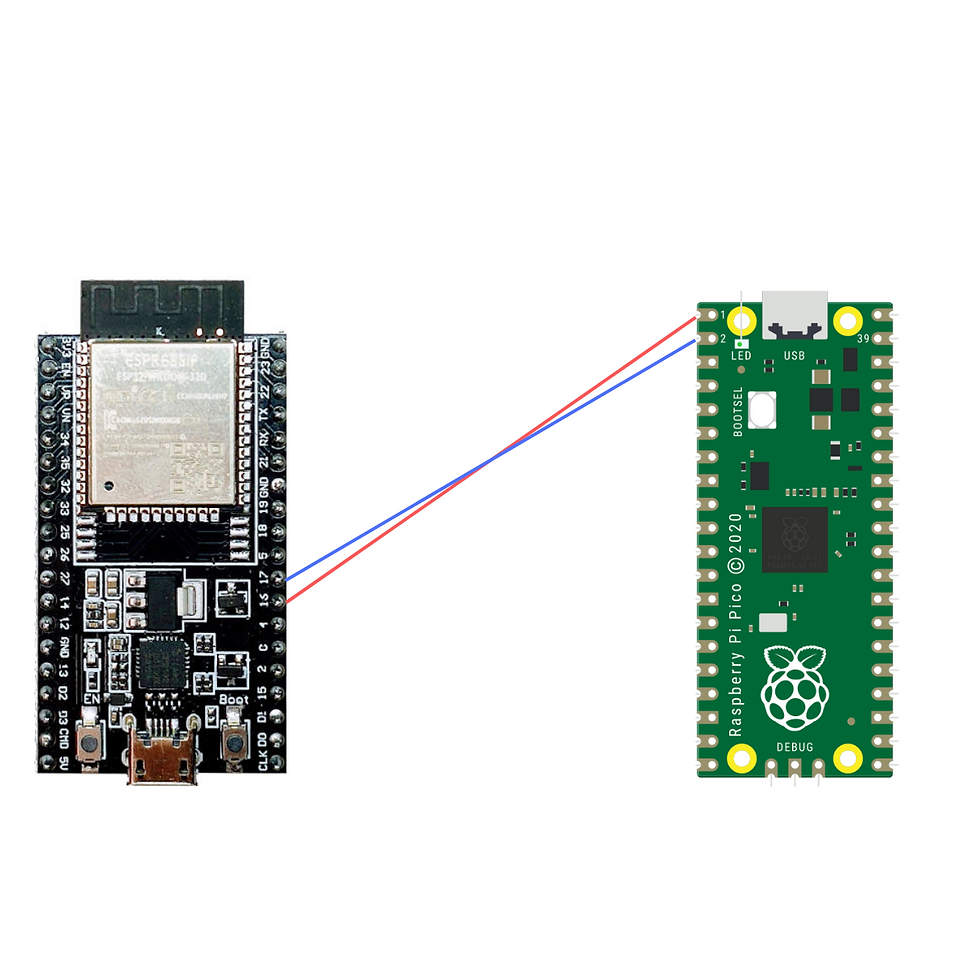
Wiring Diagram
ESP32 pin 16 -> PICO GP0
ESP32 pin 17 -> PICO GP1
CODE
code in micro-python IDE like Thonny-----------------------------------------------
import machine
# Set the UART pins
RX_PIN_PICO = machine.Pin(1) # Use any available GPIO pin as RX on Raspberry Pi Pico
TX_PIN_PICO = machine.Pin(0) # Use any available GPIO pin as TX on Raspberry Pi Pico
# Set the baud rate
BAUD_RATE = 115200
# Initialize UART object
uart_pico = machine.UART(0, baudrate=BAUD_RATE, rx=RX_PIN_PICO, tx=TX_PIN_PICO)
# Loop for receiving and sending data
while True:
# Check if data is available on UART
if uart_pico.any():
# Read and decode the received data
data = uart_pico.read(uart_pico.any()).decode('utf-8')
# Print the received data
print(data, end='~')
# Send data back to ESP32
uart_pico.write('Received: ' + data)
Code in Esp 32----------------------------------------------
#include <HardwareSerial.h>
// Set the UART pins
#define RX_PIN_ESP32 16 // Use any available GPIO pin as RX on ESP32
#define TX_PIN_ESP32 17 // Use any available GPIO pin as TX on ESP32
// Set the UART pins for Raspberry Pi Pico
#define RX_PIN_PICO 1 // Use any available GPIO pin as RX on Raspberry Pi Pico
#define TX_PIN_PICO 0 // Use any available GPIO pin as TX on Raspberry Pi Pico
// Set the baud rate
#define BAUD_RATE 115200
// Initialize UART objects
HardwareSerial uart_esp32(1);
HardwareSerial uart_pico(0);
void setup() {
// Start the UART communication
uart_esp32.begin(BAUD_RATE, SERIAL_8N1, RX_PIN_ESP32, TX_PIN_ESP32);
uart_pico.begin(BAUD_RATE, SERIAL_8N1, RX_PIN_PICO, TX_PIN_PICO);
// Initialize Serial Monitor
Serial.begin(BAUD_RATE);
}
void loop() {
// Read data from Serial Monitor and transmit to Raspberry Pi Pico via UART
if (Serial.available()) {
while (Serial.available()) {
char data = Serial.read();
uart_esp32.write(data);
}
uart_pico.flush();
}
// Receive data from Raspberry Pi Pico and print to Serial Monitor
if (uart_esp32.available()) {
while (uart_esp32.available()) {
char data = uart_esp32.read();
Serial.write(data);
}
Serial.flush();
}
}
you can use serial monitor to send text or number as example. check out...


Comments