Keypad Tutorial with Arduino
- eMbed Workshop
- Apr 10, 2023
- 2 min read
Updated: Jun 9, 2023
Let's explore the functionality of the 4x4 Keypad - a device with sixteen push buttons arranged in a 4x4 matrix, commonly used for inputting data or controlling menu options in embedded systems, such as Arduino projects.

BASICS
The Arduino 4x4 keypad is a device that allows for user input in a compact and easy-to-use format. The keypad consists of 16 buttons arranged in a 4x4 grid, with each button corresponding to a unique symbol or character. By connecting the keypad to an Arduino board, you can read the button presses and use them for a variety of applications.
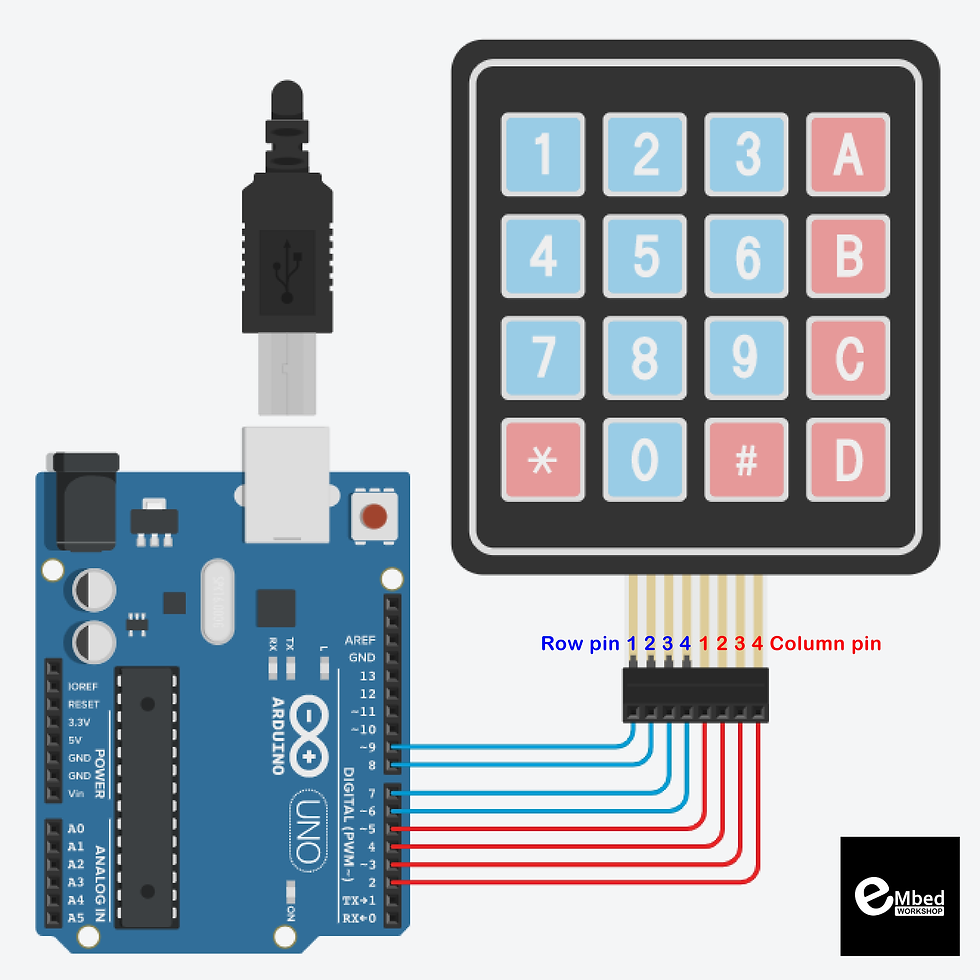
The keypad typically connects to the Arduino's digital input pins, with each row and column of buttons connected to a specific pin. When a button is pressed, it completes a circuit between the corresponding row and column pins, allowing the Arduino to detect the button press.
Wiring Diagram

row Pin 1 -> Arduino 9
row Pin 2 -> Arduino 8
row Pin 3 -> Arduino 7
row Pin 4 -> Arduino 6 column pin 1 -> Arduino 5 column pin 2 -> Arduino 4 column pin 3 -> Arduino 3 column pin 4 -> Arduino 2
CODE
#include <Keypad.h>
const byte ROWS = 4; // number of rows in the keypad
const byte COLS = 4; // number of columns in the keypad
// define the symbols on the buttons of the keypad
char keys[ROWS][COLS] = {
{'1', '2', '3', 'A'},
{'4', '5', '6', 'B'},
{'7', '8', '9', 'C'},
{'*', '0', '#', 'D'}
};
// define the row and column pins of the keypad
byte rowPins[ROWS] = {9, 8, 7, 6};
byte colPins[COLS] = {5, 4, 3, 2};
// initialize the keypad
Keypad keypad = Keypad(makeKeymap(keys), rowPins, colPins, ROWS, COLS);
void setup() {
Serial.begin(9600); // initialize serial communication
}
void loop() {
char key = keypad.getKey(); // read the pressed key
if (key != NO_KEY) { // if a key is pressed
Serial.print("You pressed: ");
Serial.println(key); // print the pressed key to the serial monitor
}
}


Comments